
Overview
This guide will help you get OBS installed on your machine.
You Will Need
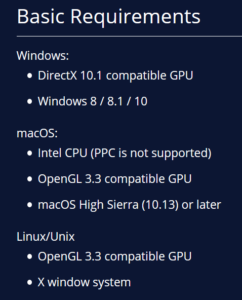
- A computer meeting the minimum specs for OBS:
- Internet speeds capable of streaming (min 2.5-4 Mbps) You can check your speeds using Ookla’s Speed Test for free
- OBS (instructions below)
- Something to stream
- Optional:
- A streaming account (you can save the video for later editing)
- Webcam / microphone (strongly recommended)
Getting Started
Downloading OBS
- Head to the OBS website. OBS stands for open broadcaster software. This is the software that provide the interface between whatever you want to stream and the place you will stream it to.
- From here you can either click the download button in the top right > your platform > download installer, or click your platform of choice. Either way a dialogue box will appear prompting you to save the file. Do so.
Installing OBS
- Open the file and dismiss any prompts for permission as appropriate. Click through the first installation pane.
- Read the GNU if you so desire (I’ve taken to actually skimming these things), click next, then select a location to install the program to. By default the location is C:Program Filesobs-studio . Click install.
- Ensure “Launch OBS Studio is checked and click Finish
Using OBS the Easy Way
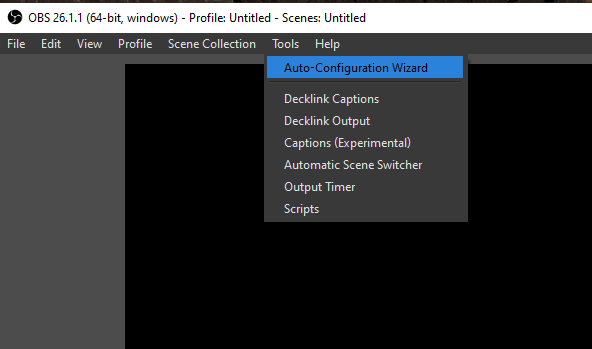
Auto Configuration Wizard
- I’ll save the cranky man rant about how in my day we had to fine tune every setting for another time. Thankfully, OBS has implemented an auto configuration wizard.
- This wizard should start automatically when you launch OBS for the first time.
- If the auto configure wizard does not start automatically, click Tools > Autoconfiguration wizard.
- Select your option here:
- If you will be primarily streaming your videos to Twitch, YouTube, Mixer, etc. Select the “Optimize for streaming, recording is secondary” This will prioritize speed rather than quality.
- If you will be recording video for upload at a later date, select “Optimize for recording, I will not be streaming.” This will create large, high quality videos that you can use with a program such as Adobe Premier to edit.
- We can ignore “I will only be using the virtual camera” for now.
- Video Settings default options are the monitor resolution and FPS at 30 to 60 but prefer 60 when possible. This prioritizes your framerate. The alternative option is to pick “Either 60 or 30, but prefer high resolution” which will mean you’ll spend more time at lower FPS but your video will be a higher quality. You can choose either or and switch later if you’re getting complaints about your video output. Click Next.
- Worth mentioning: FPS here denotes the video stream FPS. Think of when you stream Netflix you’re watching that at a set FPS. This is not the FPS of your game.
- Stream Information
- Select your service. For most services there is an option to “Connect Account (recommended)”. If you use this option a box will pop up to ask for your login information. Provide it and click Log in. Enter your authy 2FA if required (if you’re using a personal, private computer it’s highly recommended to click the “remember me for 30 days” box). Finally click Authorize.
- If you would rather use a Twitch stream key and not login:
- Head to Twitch.tv
- Login or sign up
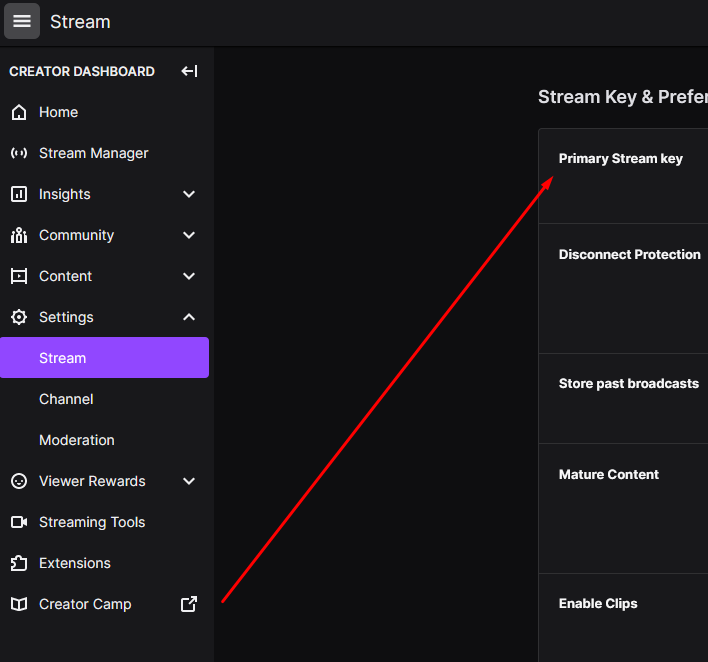
- In the top right corner click your profile icon and go to “Creator Studio”
- In the new sidebar that appears go to “Settings” and then “Stream” under the new submenu.
- The very first line says “Primary Stream Key” click the button to copy this key (don’t worry if it’s not visible and just appears as a number of dots)
- Back in OBS click “Use Stream Key”
- Ignore that there’s an option to jump right to this page using the “Get Stream Key” button. You should start to become familiar with Twitch Creator Studio 😀
- Paste the value in the box
- Leave the two options underneath checked (let the bitrate test proceed and prefer hardware encoding) then click Next.
- Final Results
- A bitrate test will occur and recommended settings will appear
- Click “Apply Settings”
- Twitch chat and information about your stream will appear (Unsure if this occurs if you just use your stream key).
- Update your title, go live notification, category, and tags as you wish. Then click Update information
Setting Up Your Stream
- Scene vs. Source
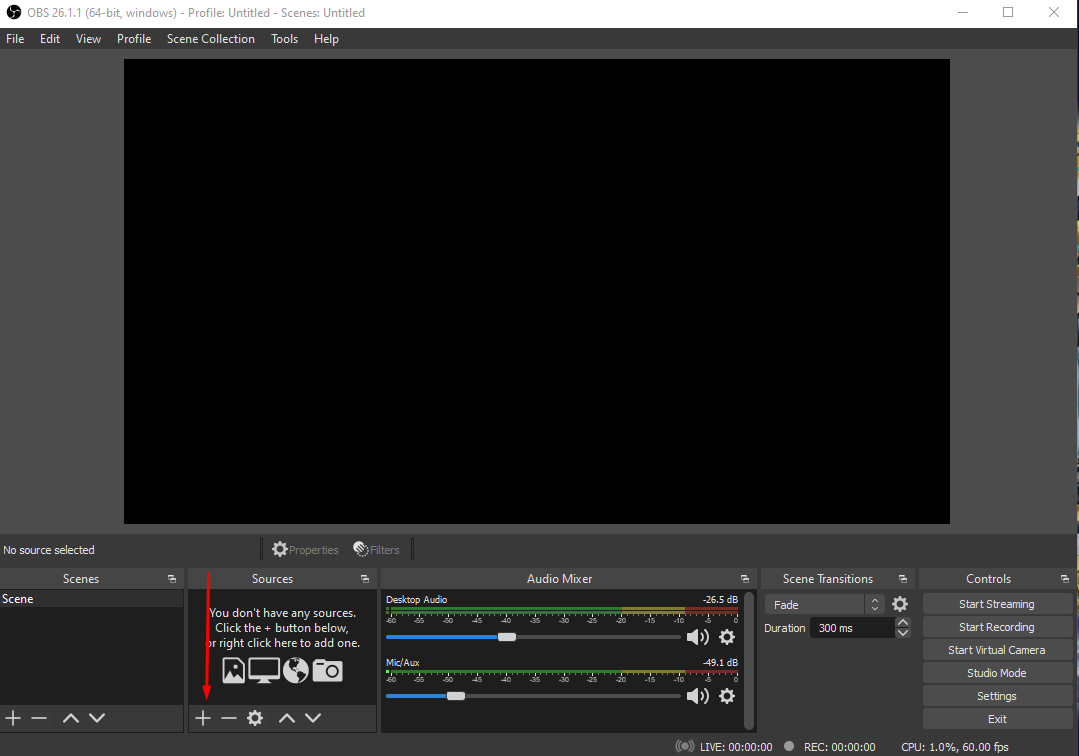
- At the bottom of OBS in the left corner there is an option to add a “scene” and next to that an option to add “sources”
- Scenes are the visual look of your stream. You may want a saturday morning “chill” stream where your webcam takes up more of the screen real estate or different overlays can be applied. Further tutorials will explain how to set up your first scene. For now, the scene can be ignored.
- A Source is where your stream input comes from. OBS supports a number of input options. If you’re interested in seeing the purpose behind each of them you can see explanations for each option here.
- Let’s add a source. Click the + under the “sources” panel
- Let’s stream something! To make things easy, start the game you want to play.
- Back in OBS click Add Source > Game Capture. Title it, for example Among Us Stream. Click Next.
- For Mode I like to “capture a specific window” so I don’t accidentally expose some personal information. You are free to pick however you’d like though. If you pick “capture a specific window” then under “window” find the game.exe option.
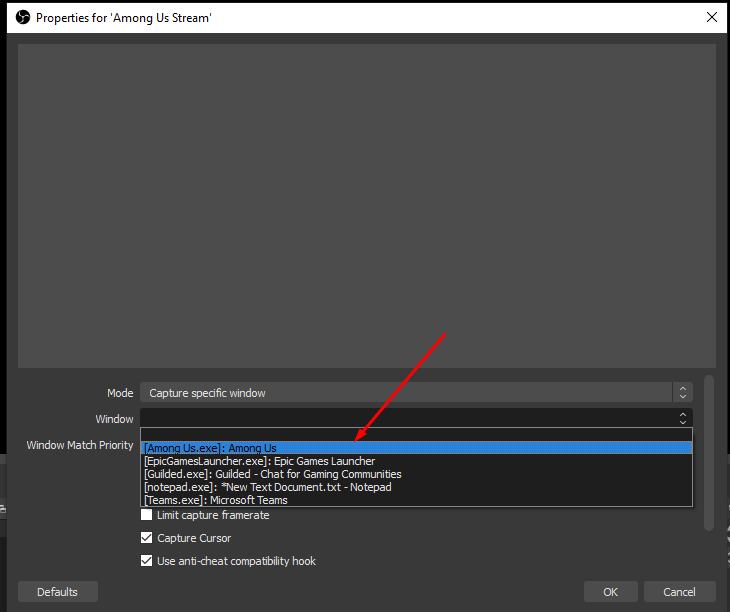
- When you select it, if everything is going right the game should preview in OBS now. If nothing shows you can change the Window Match Priority to one of the other options to see if it fixes it. If nothing here works you can try a screen capture source instead following the same steps as above. If you still see nothing, join our guilded server and ask for help and we’ll see if we can help you.
- Click Ok and you’re done you’re ready to hit that big button on the right Start Streaming. Congratulations on your first step!
- It’s a good idea to head to your twitch channel to ensure that it looks and sounds OK.
If you have any ideas for future streaming tutorials or comments/questions on the formatting of the post please let me know in the comments below
Get involved!
Comments