
Overview
Previously we looked at how to get OBS up and running to stream to Twitch. This guide will cover the basic concept of adding a webcam to your stream.
You Will Need
In addition to the materials needed in the previous guide you will now require:
- A Webcam. I don’t make any money off affiliate links but the Razer Kiyo is an affordable-ish high quality streaming webcam.
- Optional: A screen. These are less and less important as technology increases and allows you to filter out your background without the need for a screen.
- Optional: A Microphone. You can use the microphone included with your webcam but it’s generally not going to sound as good as if you purchase your own mic. Still, a nice microphone is expensive and if you’re just starting out feel free to skip it until you can afford it.
Steps
The Following steps will setup a “just chat” stream where you are the main focus (webcam fill screen)
- Open up OBS
- Create a new Scene and name it something so you’ll remember that this is your webcam only stream.
- Ensure your webcam is plugged in and if necessary, turned on.
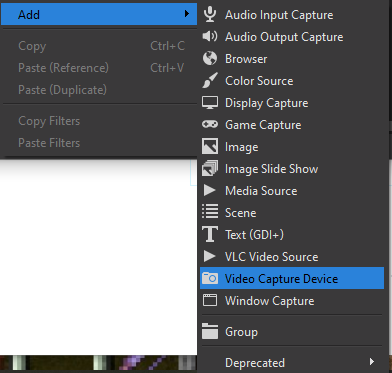
- A scene is a collection of sources. To start let’s simply create a scene with a webcam source – click the ‘+’ icon in the ‘sources’ pane or right click and go to ‘add’
- Select ‘Video Capture Device’
- Name the new capture device. A short note about naming: While the temptation to name all of these things “Barry” and “Larry” and “Jerry” exists, please try to remember that down the line you will have named well over 20 – 30 items. Be as descriptive and succinct in naming conventions so that you’ll have no trouble remembering “Oh yeah this scene is for Sunday morning coffee chat” instead of “which sitcom character means microphone?”
- Under “Device” select your device. As mine is an older Logitech it was labeled simply USB Video Device. Yours may have a more specific name. When your device is selected appropriately your webcam input should appear.
- Most of the settings here can be left at default. The one thing you may wish to change is if you’re using a separate microphone click “use custom audio device” and then select your microphone.
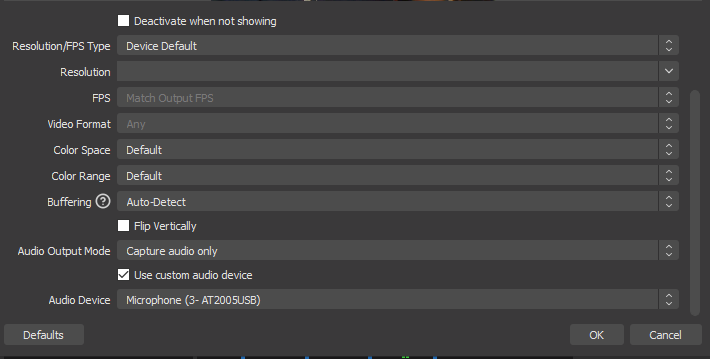
- Feel free to mess around with color and contrast until the preview shows the desired output.
- Click “OK” when satisfied and test it out using “start recording” (videos are saved by default in your “Videos” folder C:\user\xfdafds\videos where xfdafds is your username.) You’re finished!
- Optional: If you selected a different audio device you can set up mic input same as you did video input in its own source. This separates the audio and video streams and can be useful later on down the road. Go to “add” audio input and add your mic under the “Sources” pane.
Steps, Advanced
The following steps will allow you to add a small window with your webcam feed into an existing stream.
- Get your Webcam into the Source of your ‘Game Stream’ scene.
- If you followed the steps above this will be very easy. If you did not follow the steps above, then follow them to add your webcam as a source. Do so in the “Scene” of your game streaming.
- If you followed the steps above, right click your webcam source and go to “copy”. Right click in the source of your game stream and go to Paste (as reference)
- You’ll have a new box with a red outline overlaying your scene preview. Sources are arranged in layers. If you’ve ever used Adobe photoshop you’ll be instantly familiar with this. Layers are arranged in heirarchacal structure: The topmost layer is on “top” of the scene and the bottommost layer is your “background”. You can play around to further understand this by dragging the location of your webcam. You can see that if you drag it under your video stream it will disappear. Keep this in mind as we continue with OBS and StreamLabs OBS!
- Resize the box and drag it to your desired location. That’s it! You now will have two sources (or three if you add your microphone)
- Your window capture (usually a game)
- Your webcam
- Verify everything is working and you’re good to go!
Discussion
Setting up scenes is one of the most important things a streamer can do. If you see any ‘big’ streamer they almost always have a webcam source! Showing your face is a great way to connect with your audience and humanize yourself. Knowing the basics of Scene…setting, so to speak, is an important step before adding in the “good” stuff like subscriber notifications, frames, counters, etc. Pat yourself on the back, you did good today!
Get involved!
Comments